 I have been thinking about how to make my home smarter for a little while now, but never really had a truly compelling reason to make the investment. The most common use of smart home devices seemed to be turning on and off lights, which didn’t really appeal to me. I think a physical light switch is far easier (and quicker) to use than pulling out a smartphone, turning it on, entering a pass, finding and loading an app, navigating to a particular light and hitting the on button. A couple months ago, I finally found an excuse to dip a toe into the world of home automation. A few people in our neighborhood had a sewer back-flow issues and ended up with flooded basements. Not wanting that to happen to me, I started investigating water and leak sensors that send a notification or text message to my phone if water is detected. I found a few stand-alone options, but eventually opted for something that would be a little more extendable in the future. I landed on SmartThings. This company started as a Kickstarter project in 2012 and were recently purchased by Samsung. The SmartThigns model works in a hub + device model. You install a small hub, and connect it to power (it also has battery backup) and your network, and it talks to all the smart home devices (the “things”) that you install. One of the reasons I liked SmartThings was that it functions with a lot of different smart home technologies including ZigBee, Z-Wave, IP independent of the manufacturer. There are a number of products on the market that only talk to one specific brand of device. SmartThings is very open, and will work with any devices using those communication technologies.
SmartThings Home Monitoring Kit
To kick things off, I purchased the home monitoring kit. SmartThings sells just the hub alone and each of it’s “things” as well. I was keeping and eye out, and found a good sale on the full Home Monitoring Kit, which includes the hub and a number of additional devices to use with it.
- Two Multipurpose Sensors to monitor whether doors, windows, cabinets, or your garage are open or closed
- A Motion Sensor to monitor movement in your home
- An Outlet to control lights, electronics, and small appliances
The hub is a small white box, a little less than 5″ in size. You plug it into power and into your network and you’re good to go. Setup is pretty straightforward. You use the hub ID printed on the device, and connect to it for the first time with the SmartThings app on Android or iOS. Once it’s configured, you use the app to interact with it and connect additional devices to it. I have only used one of the devices in the kit so far, the multipurpose sensor, which I’ll go into with my garage door setup below.
- The hub sitting on a shelf under the watchful eye of a sock monkey
- The back of the hub with power and ethernet plugged in
- The Home Monitoring Kit box with remaing devices
Leak Sensor
The SmartThings Water Leak Sensor is the primary reason I jumped into this in the first place. I purchased two sensors, one for the sump pump room and the other for the room with my water heater and water softener. The sensor is just a small battery-powered box with two short metal prong on the bottom. Setup is pretty easy with this “thing” as well as all things. You power up the device and then via the app select “Connect New Device.” the hub will see it and let you know what it found. From there you can set up rules and routines for those devices, and put them into groups, or “rooms” to organize them. For the water leak sensor, when water comes in contact with the two prongs on the bottom, it sends a signal to the hub which then follows the rule I set up and sends out an alert via the SmartThings App as well as a text message. The video below shows the sensor and what happens when it comes in contact with water (a wet paper towel in my demo).
Lighting Control
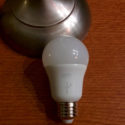
You’re probably reading this and thinking, “This is exactly what you said you didn’t want to do with a smart home devices! You Lying Liar!” Whoa, calm down there… The special sauce to this project are the rules that can be set up with SmartThings devices. For this project I started with a couple of ZigBee capable light bulbs from OSRAM that I found on sale at Lowes. I bought the OSRAM LIGHTIFY LED Bulb CLASSIC A Tunable White. This shows where the SmartThings system shines when compared to other proprietary systems. It has the capability to work with devices not made or manufactured by SmartThings. Since these bulbs are ZigBee capable, SmartThings picks them right up since it speaks the same language. I added the bulb via the app just like I added the water sensor, and then set up some rules for it. I previously had a lamp in the living room set up on an old mechanical outlet timer. The lamp would turn on at a set time in the evening so I didn’t come home to a dark house, and would shut off later at night after I’d gone to bed. This also served (hopefully) as a theft deterrent when I went on vacation, showing lights on in the house when I’m not there. So with these new light bulbs, I set them up to turn on at sunset (which changes automatically throughout the year), and turn off at a certain time at night on Sunday-Thursday when I go to bed a bit earlier, and then turn off a little later Friday-Saturday when I’m up a bit later. Additionally, it does give me control of the lights through my phone, as well as dimming capability. The second part of that does add some steps (like I mentioned above), but the primary use of the light control is the rules that I can set. If I wanted (and this might be a future project), I could hook the motion detector thing (that came in my kit) to this lighting rule and set up an if-then-statement saying if there is motion in the room and it’s beyond the normal turn-off time, keep the lights on until there is no motion for X minutes. There are all kinds of great ways to chain events, rules, and things together with SmartThings.
Garage Control
This third project took a little more tinkering than the other two. It’s a bit home monitoring and a bit convenience. It takes advantage of the SmartThings Multipurpose Sensor that came with the Home Monitoring Kit, as well as a smart garage door opener that I cobbled together (spoiler alert: I got to use the soldering iron!). The first part was easy. I simply activated the Multipurpose Sensor via the SmartThings App and attached it to the garage door with the included double-sided tape. This sensor can tell orientation, so I told SmartThings that vertical meant the door was closed, and horizontal meant the door was open. Now I can tell easily on my phone if the door was accidentally left open, or if it’s securely closed.
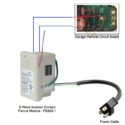
Part two of this project is using SmartThings to also control the door. I found a Z-Wave Isolated Contact Fixture Module that SmartThings can communicate with. I think the primary purpose of this module is to control a switch on or off. You could mount it behind a light switch or something similar. I took it and connected it to an extra garage door opener remote, so it makes the on connection when activated to simulate a button push on. I soldered some lower gauge wires to the button contacts on the circuit board of the remote and hooked those to the relay output wires (blue), and then connected the power (white and black) and ground (green) to a power cable (wiring manual PDF). I made sure the contact module was communicating with the SmartThings hub, and then I bundled it all up in a plastic project box to keep it together. Since this is controlling a button on the remote, I had to tell SmartThings that it’s not a simple on or off switch (which it wanted to do by default), but a button, which makes activation stay on for a couple seconds, then automatically turn off. Otherwise SmartThings would keep the button in the on position until it was switched off in the app. Once I figured that out, I grouped the sensor and the contact module together in a “room” in SmartThings, so that I can see if the door is opened or closed, and then hit the button/icon directly below it to control the door. It’s nice to be able to check if the door is closed, and then to open it if I only have my phone with me.
- Multipurpose sensor on garage door
- Project box with garage electronics
- Garage remote wired to relay module
- Garage remote wired to relay module in project box
- Remote switch wiring
There you have it… the start of a smart home. I’ve still got some more devices in my smart home kit to play with and configure. What should I add next?


[…] out my last smart home post, Making My House a Bit Smarter with SmartThings, to see how things got […]